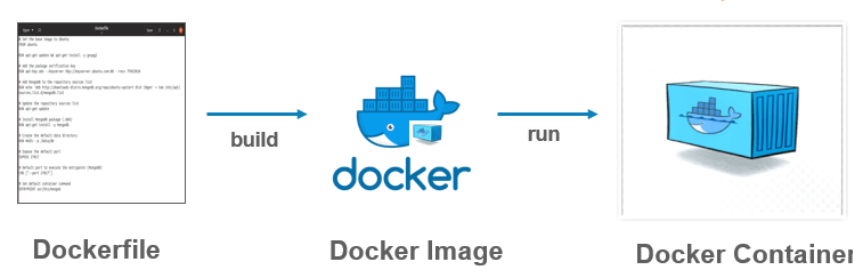
The way to build docker image explain for absolute beginner.
In my last post, I have made a short but deep explanation about docker architecture. As you already know, docker is the blackbox use to package our application and deploy it somewhere to the cloud or to an on-premise solution server, the package consists of not only our application code, but also the runtime to launch and run the application like nodejs, dotnet core or java runtime. Docker fits very well in cloud and microservices ecosystem (in some of my posts I’ll deploy docker package to microsft azure as microsoft azure web app or microsoft azure container service which are the PAAS solution for Azure). Docker package is call “Docker image”, and to build docker image, we need to write a simple text file call “docker file” which contain step by step docker commands to build the image, some tools like visual studio make this task very easy by auto-generated a docker file while creating for exemple a dotnet core project ( coming soon in another tutorials), but docker also have a file call “docker compose” write in “yaml” for managing multiple containers together, let’s view it at a first cityzens orchestrator solution for docker itself, wich is very good to test and run a cluster of microservices base on docker engine locally our in the cloud (microsoft azure web app can host container base on single docker image or base on docker compose file)
A Dockerfile consists of a series of text instructions to guide the Docker daemon to form an image, and a Dockerfile must start with the FROM directive. Docker images are created from the steps defined in Dockerfile, where each instruction forms a layer on top of the previous one. This layered design of images is the prominent feature that makes Docker images lightweight and quick to start. The underlying technology of layered Docker images is the union file system (UFS). The UFS can be considered as stackable layers of files and directories. Each layer is traceable back to its parent layer in a tree structure so that different branches can share the same root.
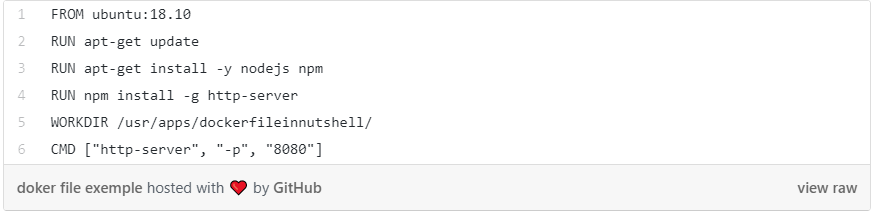
To make thinks very easy and simple, let’s write a docker file from scrach to build and image contain a nodejs runtime to run a simple web page and then explain the docker commands inside the file.
Fire visual studio code (you can take any editor like notepad++) and then copy/paste the snippet code bellow:
copy the code from here
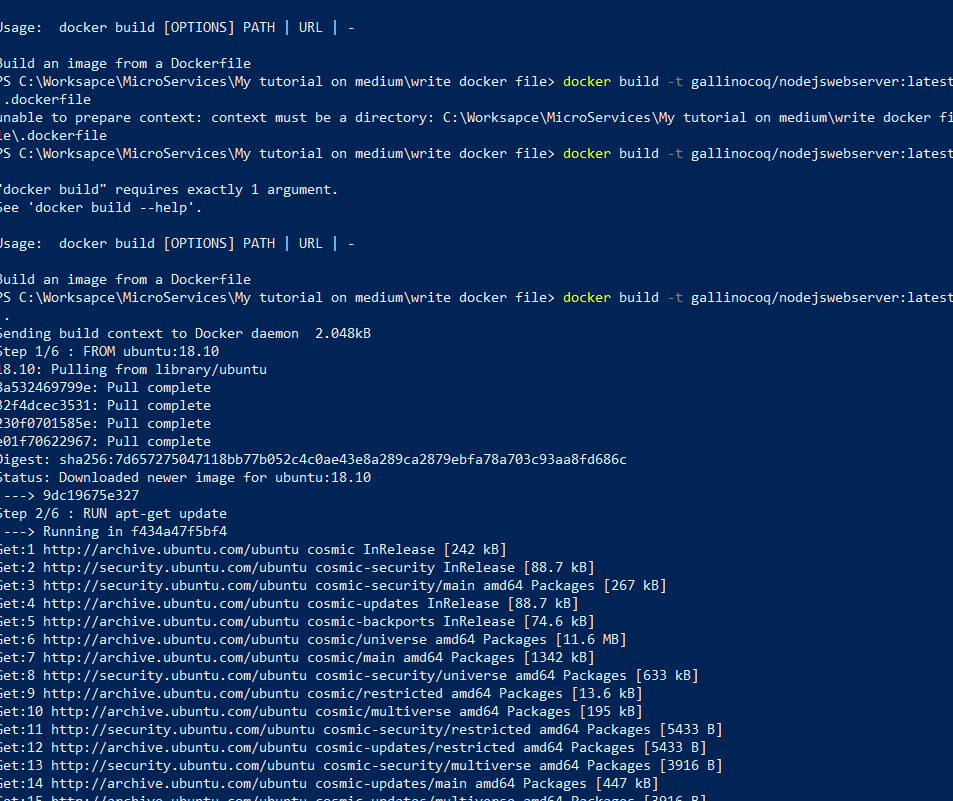
save the file as “Dockerfile” without extension in your drive, fire powershell and run the command bellow from the directory where you saved the file (don’t forget the dot (point) after “latest” word):

From the above command, replace “” with your username in docker hub if you don’t have an account on docker hub just create one it’s free. docker hub is a public repository where we will store this image to pull it later on docker runtime localy or remotly in the cloud. “nodejswebserver” it’s a repository to be created inside your account in docker hub, you can call it what ever you like.
That all, we write a small docker file to build and image base on linux ubuntu and install over it nodejs runtime,
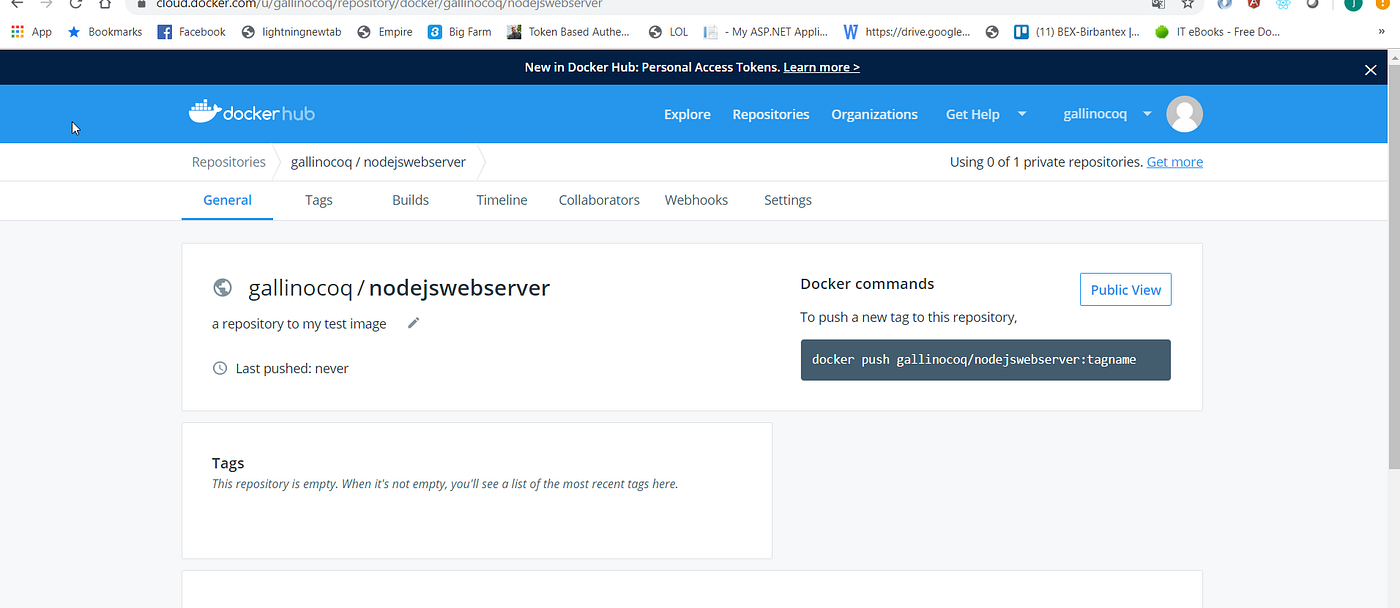
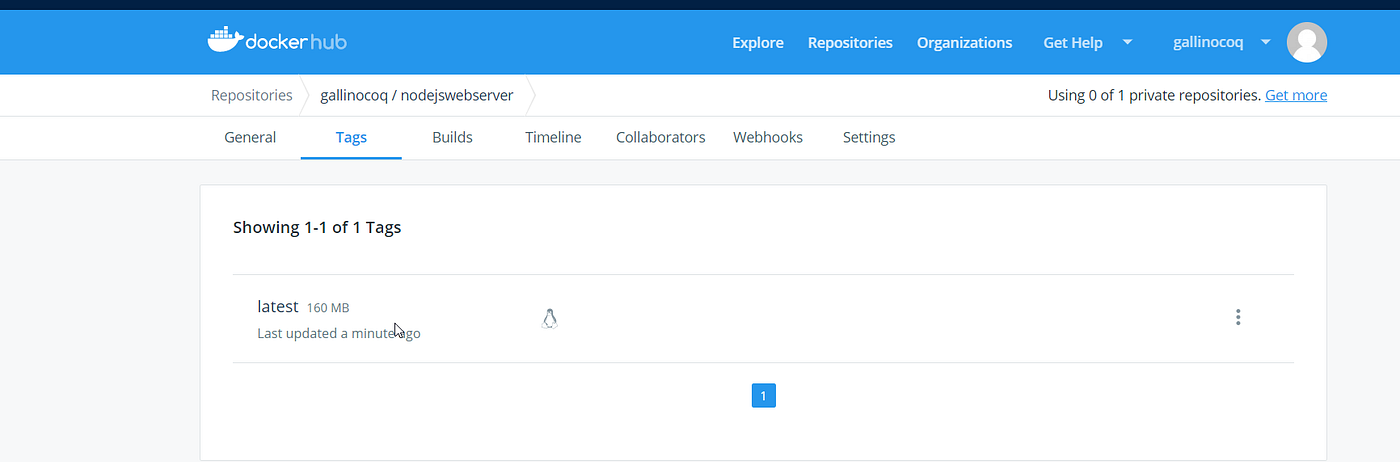
The image is now in our local machine and will be push in my repository on docker hub here :
Now go ahead and run the following docker command to push the image to the docker repository we have just create bellow .
copy the code from here:

don’t forget to replace “” with your docker registry account name and also you’ll be login from the command line before with “docker login” (you’ll need to supply your docker hub username and password).

After doing that, the image will be push to the docker registry as in the following image:
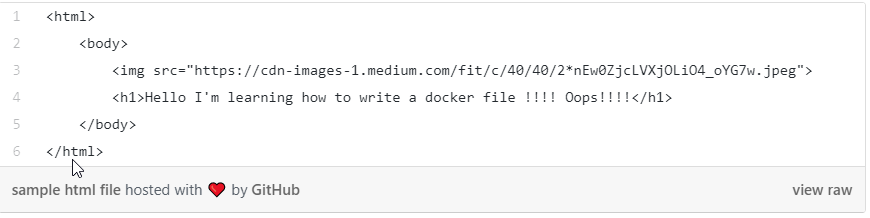
Before explaining what we have write on the dockerfile, lets try to run the image we have just push to the repository by mounting a volume from our local drive to the folder we create inside the container (“/usr/apps/dockerfileinnutshell/”), for doing that, inside our local folder, we will created an html file which content what we would like to show to our user while visiting our nodejs website.
so go ahead and create a new html file name “index.html” in the same folder where you have created the dockerfile and just copy and past the snippet code bellow:
copy the code from here
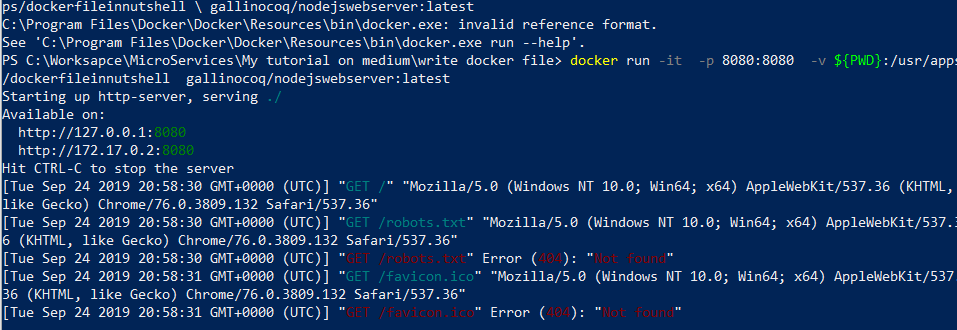
Now, we are ready to run our image and check the web page coming from docker container by nodejs http server. write the command bellow to powershell
copy the code from here:

As before, you need to replace “” with your on docker hub name.
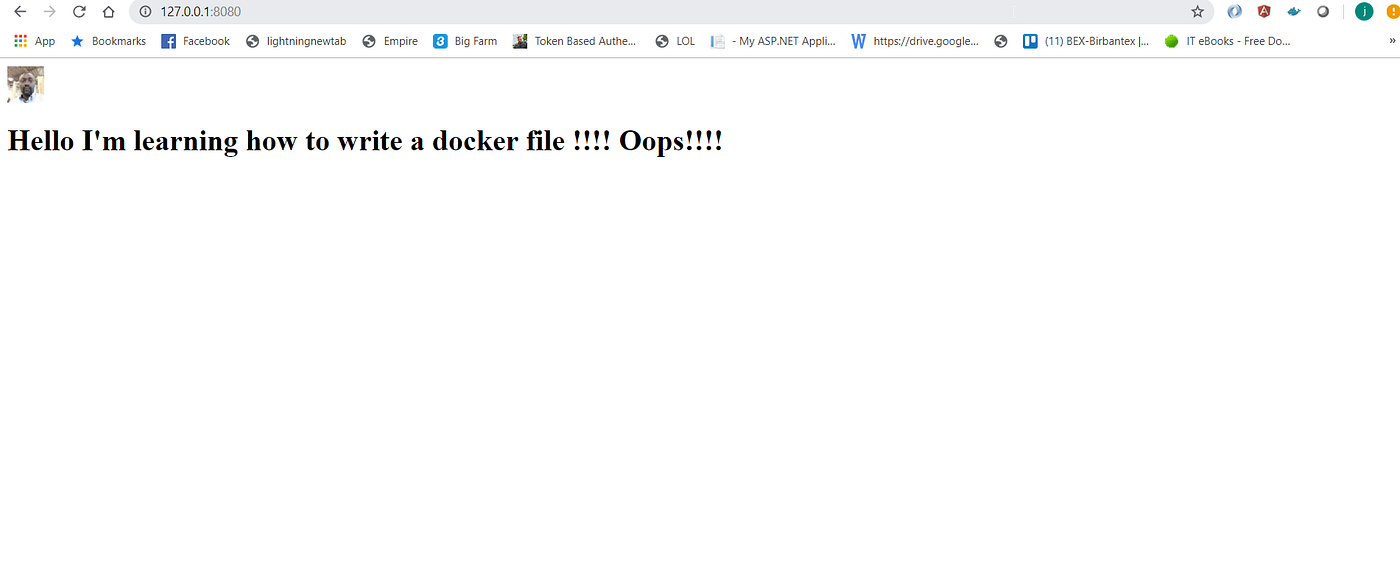
Ok cool!!!!!, we can visit our web page by navigating to http://localhost:8080 and here we are:
Now let’s explain all the instructions we have just written in the docker file (click here to get all the command we can write inside a dockerfile) I have added some other commands you’ll alway see in dockerfile that is not in our example demonstration file.
ex : ENTRYPOINT [“executable”, “param1”, “param2”]
ENTRYPOINT command param1 param2
These two forms are, respectively, the exec form and the shell form, and the syntax rules are the same as RUN. The entry point is the default executable for an image. This means that when a container spins up, it runs the executable configured by ENTRYPOINT. When ENTRYPOINT is combined with the CMD and docker run arguments, writing it in a different form would lead to very different behavior, just read it from the link above.
feel free to read all the command from the link above and try yourself by improving the file we have just use for our demonstration.
The docker build [OPTIONS] [CONTEXT] command is the only command associated with building tasks. A context can be a local path, URL, or stdin, which denotes the location of the Dockerfile. Once a build is triggered, the Dockerfile, alongside everything under the context, will be sent to the Docker daemon beforehand and then the daemon will start to execute instructions in the Dockerfile sequentially. Every execution of the instructions results in a new cache layer, and the ensuing instruction is executed at the new cache layer in the cascade. Since the context will be sent somewhere that isn’t guaranteed to be a local path, and sending too many irrelevant files takes time, it’s a good practice to put the Dockerfile, code, necessary files, and a .dockerignore file in an empty folder to make sure the resultant image contains only the desired files. The .dockerignore file is a list indicating which files under the same directory can be ignored at build time.
Docker compose on the other hand, is a tool that enables us to run multiple containers with ease. It’s a built-in tool in the Docker CE distribution. All it does is read docker-compose.yml (or .yaml) to run the defined containers. A docker-compose file is a YAML-based template, and it typically looks like this:
version: '3'
services:
 learningdockerservice:
 image:   /nodejswebserver:latest
Launching it is pretty simple: save the template to docker-compose.yml and use the “docker-compose up” command to start it.
Docker compose is basically a medley of Docker functions for multiple containers. For example, the counterpart of docker build is docker-compose build; the former builds a Docker image and the latter builds Docker images listed in docker-compose.yml. Remember, however, that the docker-compose run command doesn’t correspond to docker run; it’s actually used to run a specific container from the configuration in docker-compose.yml. In fact, the closest command to docker run is docker-compose up.
The docker-compose.yml file consists of different configurations of volumes, networks, and services. There should be a version definition to indicate which version of the docker-compose format should be used. With this understanding of the template structure, what the previous example does is quite clear; it creates a service called learningdockerservice that uses the /nodejswebserver:latest image.
Since there’s no network defined, docker-compose will create a new network with a default driver and connect services to that network, as shown at the start of the output of the example.
The network name of a container will be the name of the service. You may notice that the name displayed in the console differs slightly from its original one in docker-compose.yml. This is because Docker compose tries to avoid name conflicts between containers. As a result, Docker compose runs the container with the name it generated and makes a network alias with the service name.
A more complex docker compose file can be write as follow:
version: '3'
services:
  kiosk-example:
    image: kiosk-example
    build: ./kiosk
    ports:
    - "5000:5000"
    environment:
      REDIS_HOST: lcredis
    depends_on:
    - lcredis
  recorder-example:
    image: recorder-example
    build: ./recorder
    environment:
      REDIS_HOST: lcredis
      MYSQL_HOST: lmysql
      MYSQL_USER: root
      MYSQL_ROOT_PASSWORD: mysqlpass
    depends_on:
    - lmysql
    - lcredis
  lcredis:
    image: redis
    ports:
    - "6379"
  lmysql:
    image: mysql:5.7
    environment:
      MYSQL_ROOT_PASSWORD: mysqlpass
      MYSQL_DATABASE: db
      MYSQL_USER: user
      MYSQL_PASSWORD: pass
    volumes:
    - mysql-vol:/var/lib/mysql
    ports:
    - "3306"
volumes:
  mysql-vol: {}
As you can see, this yaml file have many service/container (kiosk-example,recorder-example,lcredis,lmysql), some depend on another, Docker compose is the same as Docker in many aspects. We can see that for every service, we need to point to an image repository, you can specify some environment variable, you can mount some volume and so on, fill free to check docker compose documentation to get all the explanation.
I hope this post will help you get some clarifications about how to write and run a docker image, we also see what is a docker compose file and try to make the difference with a classic dockerfile. See we to the next post and share.
Regards

Subscribe to Aide En Informatique's newsletter to receive the latest news and exclusive offers.
12.08.2022, 17:03
Comments: 0

12.08.2022, 17:04
Comments: 0
17.08.2022, 22:01
Comments: 0

31.08.2022, 17:12
Comments: 0
Bienvenue sur ITInnov-Design, l'espace des informaticiens, l'espace du codage, le lieu par excellence ou on essaye d'expliquer les choses complexes de manière Simple et surtout Terre à Terre pour permettre à tous ceux qui veulent s'avventurer dans le monde de l'informatique et du coding de ne pas etre frustré et d'entrer par la grande porte. Tous nos postes sont vos préoccupations et tout commentaires de votre part peut etre l'objet d'un autre post pour mieux eduquer, mieux approffondire et du coup n'hesitez pas à faire des questions, des remarques des suggestions dans tous nos canaux de communication de manière qu'on puisse aborder beaucoup de sujet meme de manière repetitives car, on peut expliquer la meme chose plusieurs fois de plusieurs manières differentes: en Informatqiuey, Qui Maitrise mieux son Sujet doit pouvoir l'expliquer de manière simple à un débutant Ou à une persone qui est nouveau ou ignorant sur le sujet c'est notre objectif.

LarrySig Guest
24.05.2024, 18:18
Post: Comment fonctionnent Internement les guichets automatiques ?
Orvilledop Guest
22.05.2024, 00:57
Post: Comment fonctionnent Internement les guichets automatiques ?
Orvilledop Guest
15.05.2024, 16:04
Post: Comment fonctionnent Internement les guichets automatiques ?
Franck Guest
14.05.2024, 19:34
Post: Comment deployer un site web statique sur github?