Two years ago, I wrote a post about DDD for beginner, so in this post I’ll follow the same path by showing in this post how we can refactoring our dotnet code to apply best design principle so that our code can be very flexible and loosely coupled.
To demonstrate the Smart UI antipattern,Suppose that a new developper Boss ask to develop a quick solution for a client, the solution is to will build a page that displays products in a grid similar to what you might typically find in an e-commerce application. The page will list products for sale, displaying their name, recommended retail price (RRP), selling price, discount, and savings percentage. Later you will introduce some business logic by allowing the user to apply a trade discount to the products on sale, but first, the initial display. As a beginner , to quickly build his page we usually use an antipattern call “SmartUI” by using a framework like asp.net web form.
ASP.NET web forms and Visual Studio make it incredibly easy to create applications simply by dragging and dropping controls onto a HTML designer. Accompanying a page, the code-behind file contains all the event handling, data access, and business logic of the application. The problem with this approach is that all concerns are mingled, causing problems for testing and resulting in a duplication of business logic because it is difficult to reuse logic that is intrinsically tied to a particular view (ASPX page).
Smart UI applications aren’t to be avoided at all costs; they are great for prototyping and for throwaway or short-lived applications. The problem, however, is that temporary applications that are successful often are modified and built upon and become mission-critical applications that are hard to maintain.
Seeing, it’s said, is believing. To that end, create an example of a Smart UI web application and start to add some business logic to it, and you should see how the concerns and responsibilities are intertwined.
So we will create a solution beginning by building an “antippatern” project base on a smartUI appication (a web form application base on .net 4.7 framework), an successively refactoring this project by rewriting it in a new project with SoC (with two clients app : MVC razor and Angular frontend consuming the same REST API base on .net core framework).
Fire visual studio 2019 and create a blank solution call “ItinnovDesign.SoC”
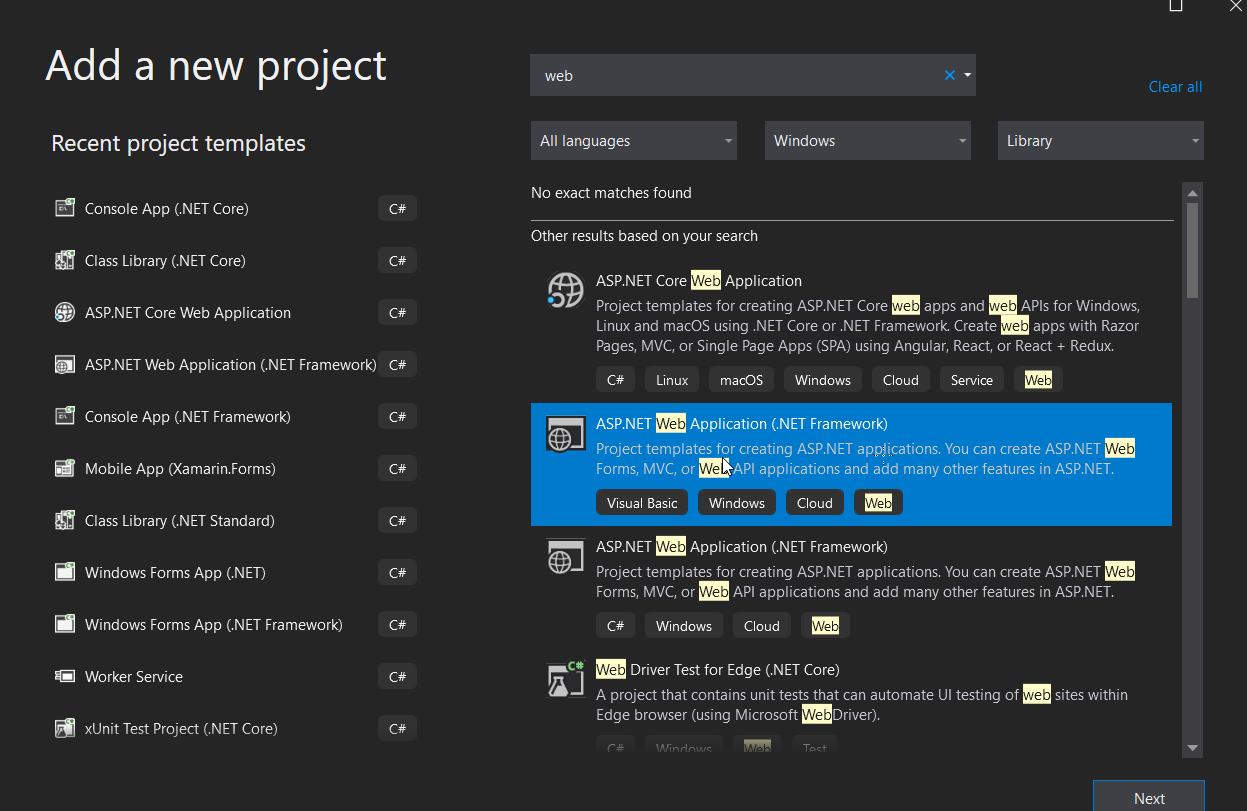
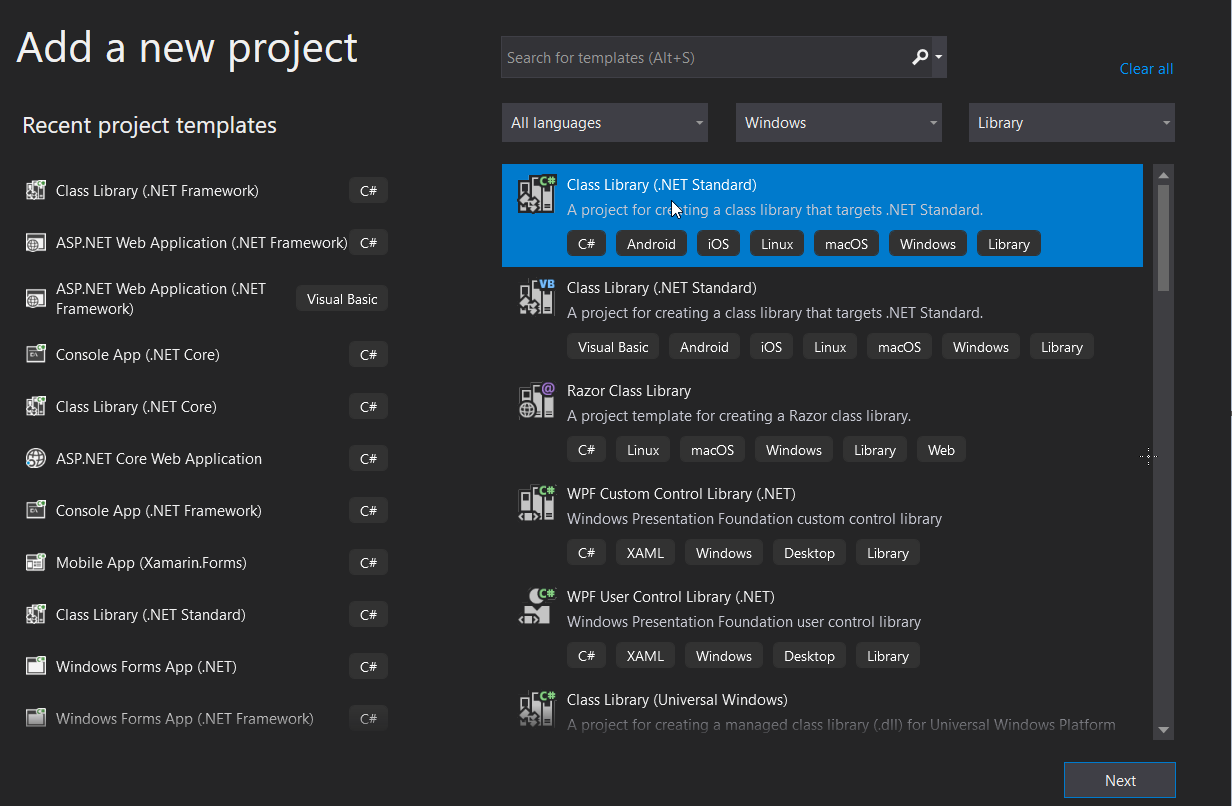
right click on the solution and add 5solutions folders : “SmartUI”, “SoC” inside “SoC” solution folder add 3 solutions folders “Backend”, “Frontend”, “Test”. From the “SmartUI” solution folder add a new asp.net framework web application based on asp.net web form as in the image bellow:


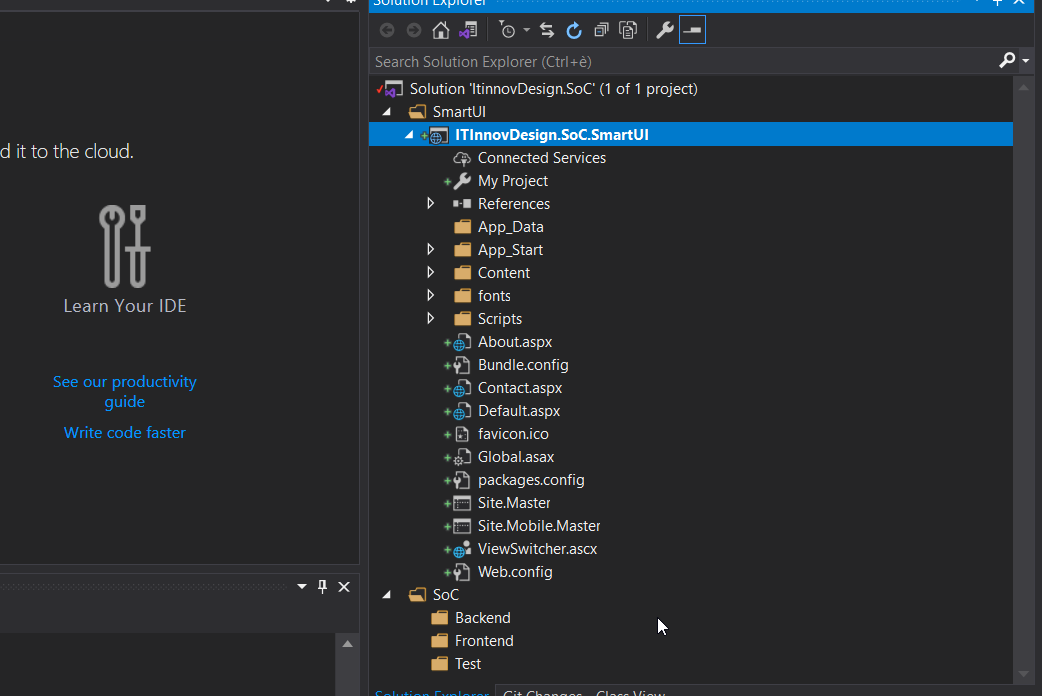
For now,your solution project will be looking as in the following image:
Now right click on the “SmartUI” web form project and selected add => new item and then “Sql server database” as in the image bellow (name the database “shop.mdf” and click yes when asking you to place it in app_data folder):

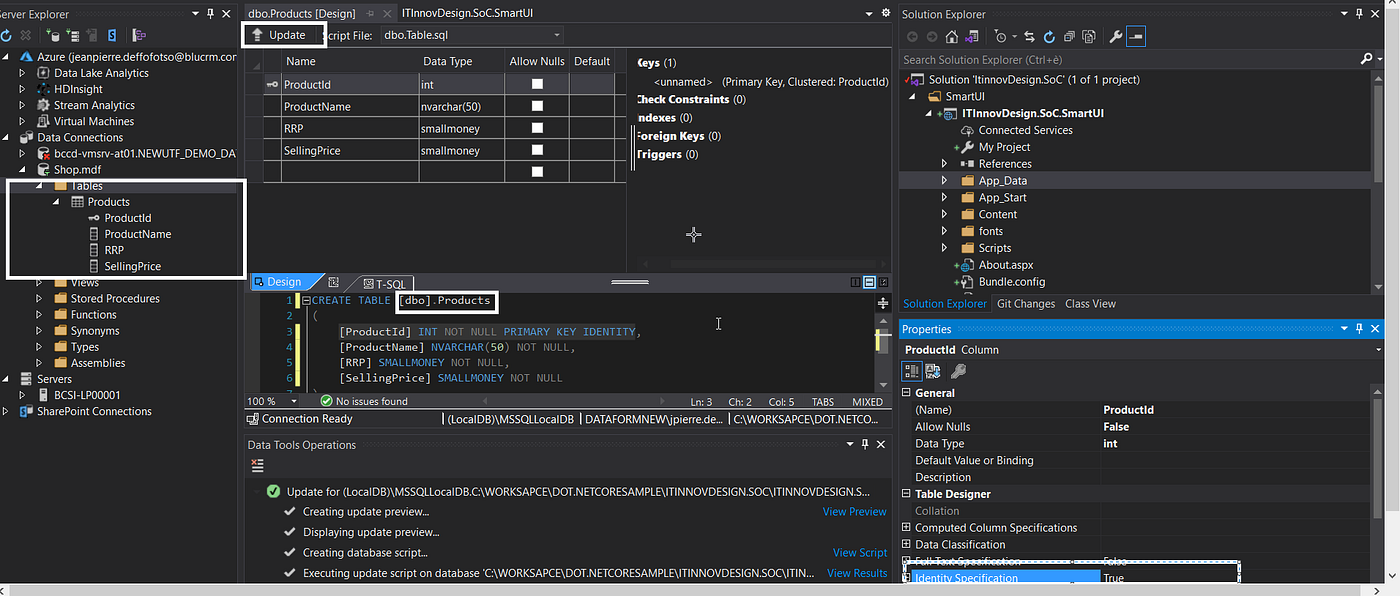
Now you need to add a table to the database to hold information on the products. Right-click on the newly created database and select Open. When the database explorer opens, right-click on the tables folder and select Add New Table from the context-sensitive menu. Create the table with the schema as shown in the image bellow, and name the table Products. Ensure you set the ProductId to an identity column so that it will automatically generate an ID.
Add some data to the table
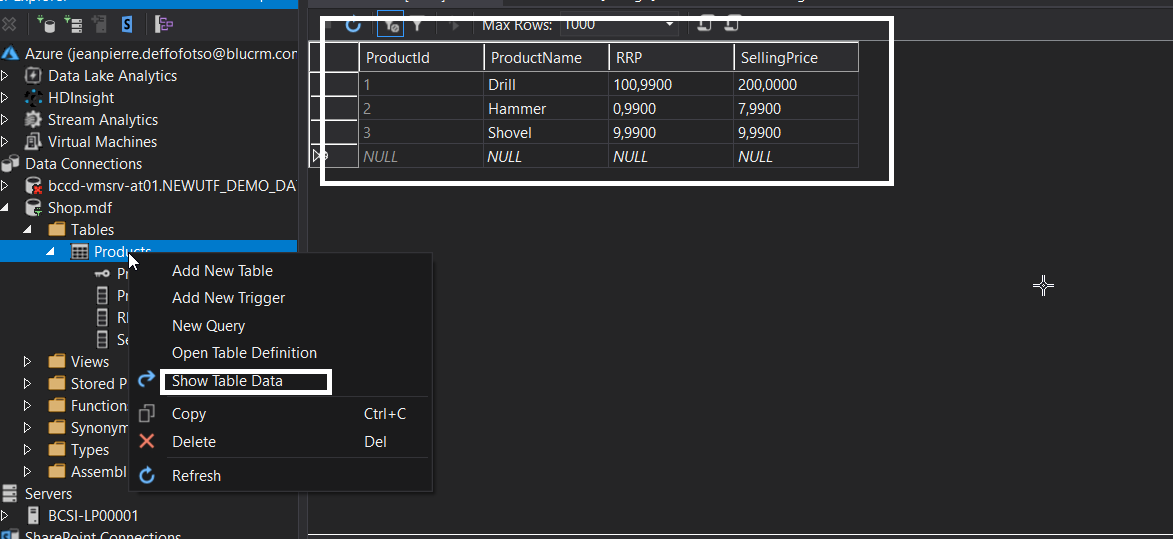
With the table created, you can simply drag and drop it onto the Default.aspx page. This automatically creates a GridView and adds a SQLDataSource control to the page. You should now be able to run the web application and see all the products listed from the database.
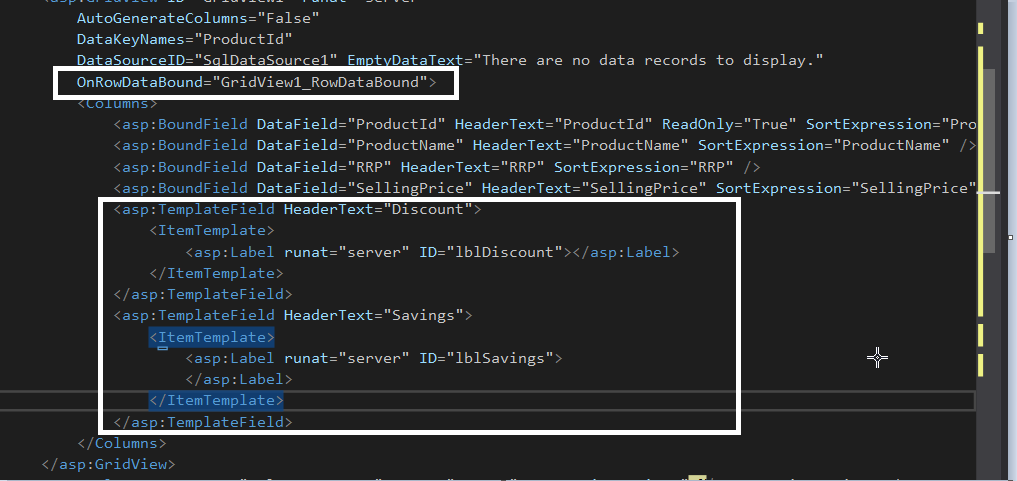
Now add the extra columns that will show any discount and savings. Edit the source file for Default.aspx to include the new template columns and the OnRowDataBound property, as shown in the following listing
After that is done, open the code-behind page, Default.aspx.cs, and add the following three methods:
The GridView1_RowDataBound method is called when each data row is bound to data in the GridView control. The method obtains the RRP and selling price and uses DisplayDiscount and DisplaySavings methods to work out the correct discount. Then it updates the corresponding label server controls. By adding these methods, you are introducing business logic into the user interface (UI) along with the data access. This means that if we wanted to display product prices on a different page, we would need to duplicate the business logic or create some kind of static helper methods.
The page is not only taking the responsibility of the business logic; as it stands, the single ASP.NET web form page is responsible for the data access requirements. Because you used the RAD server controls to provide data access, it will be extremely difficult to test the page and stub out a data access implementation.
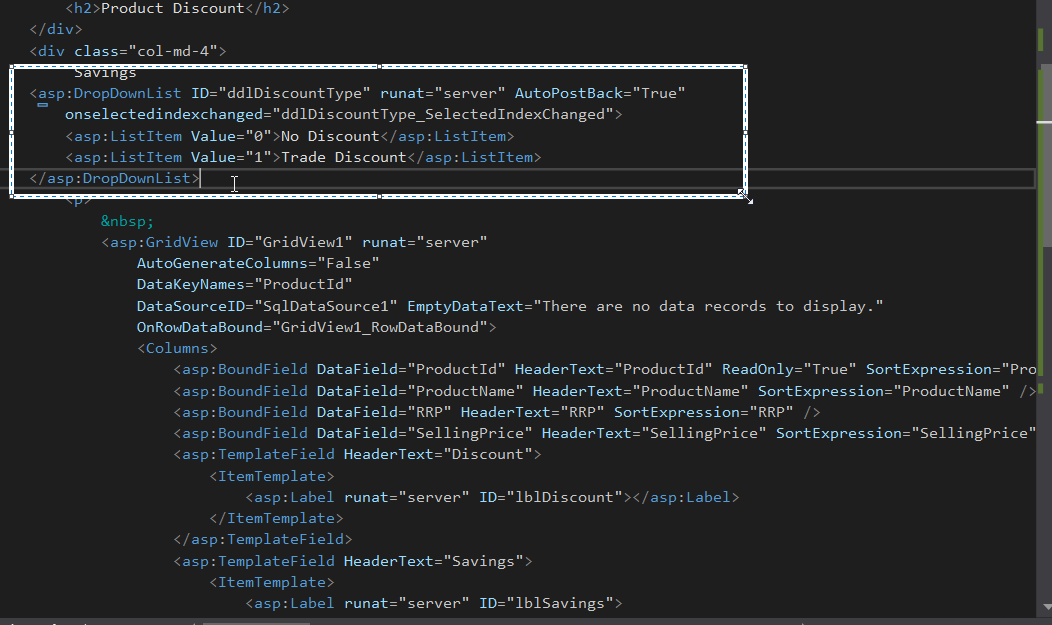
Now that the base functionality is in place, you can add the extra business requirements, which will begin to expose the issues you will face when coding to the Smart UI pattern. The business logic that you will be adding will enable a trade discount to be applied to the prices so that they reflect an extra 5 percent of savings. The UI will need a new control: a drop-down list that will enable the users to specify the discount they want to see applied to the products — trade discount or no discount.
Modify the Default.aspx page so that there is a new drop-down list control and the selling price is changed to a template field, as can be seen in the following code listing:
Now update the code-behind so that the logic that will apply the extra trade discount can be added. This can be seen in the bolded code that follows, with the introduction of a new method called ApplyExtraDiscountsTo and the update to the GridView1_RowDataBound event that will set the selling price dependent on the discount strategy applied:
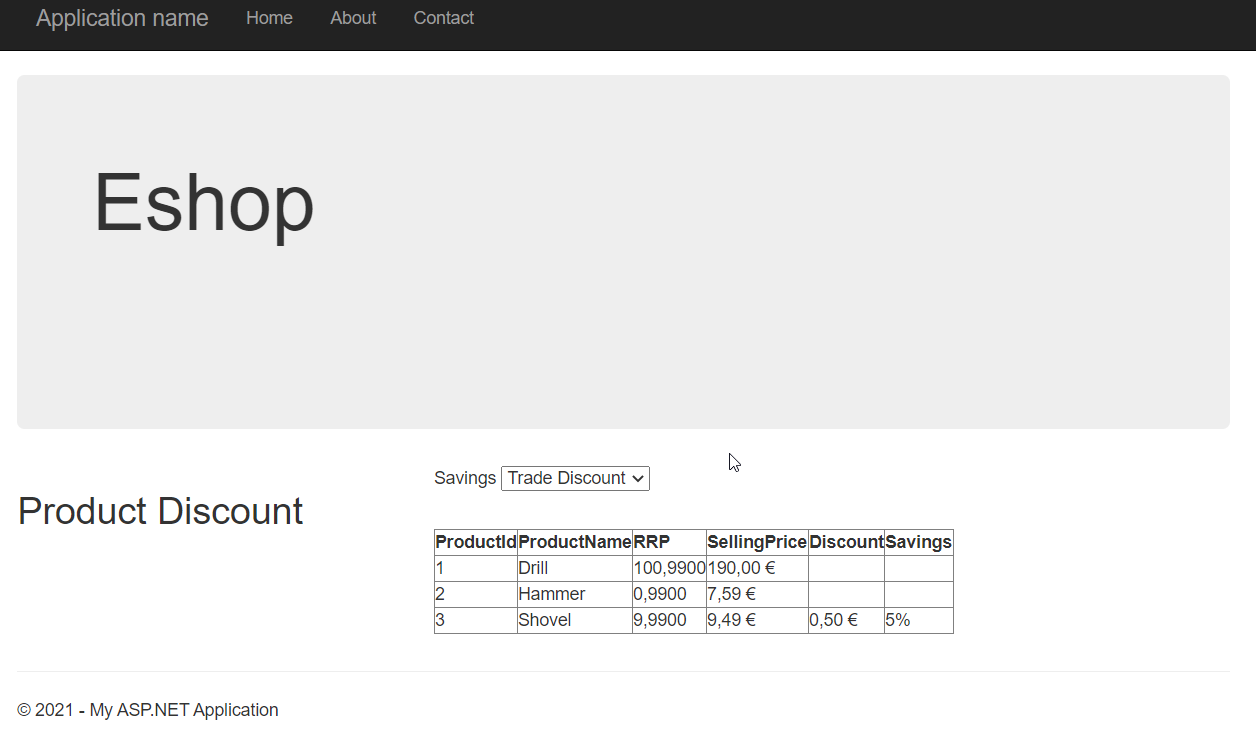
You can now run the application and change discount strategies to see the prices with the trade and no discounts applied to them.
What’s wrong with the method you used to display the products and prices? Well, nothing if the application stopped here, but because this is only part of a larger application, the capability to apply discounts will be needed elsewhere, and in its present state the logic is embedded in this single page. This means that the logic will be duplicated when new features are added.
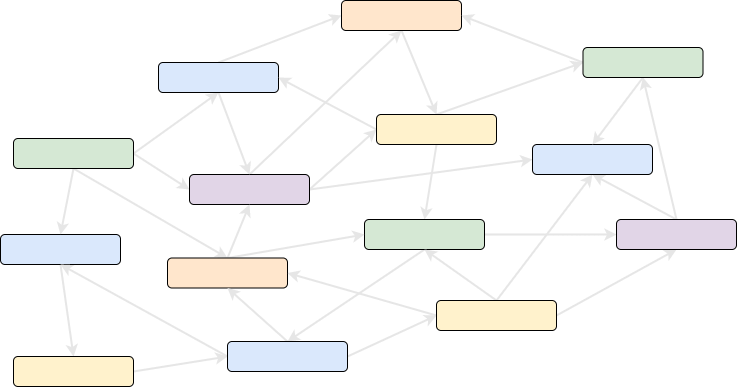
An antidote to the Smart UI antipattern is the notion of layering your applications. Layering an application is a form of separation of concerns and can be achieved via namespaces, folders, or with separate projects. The image bellow shows the typical architecture of an enterprise-level layered ASP.NET application.
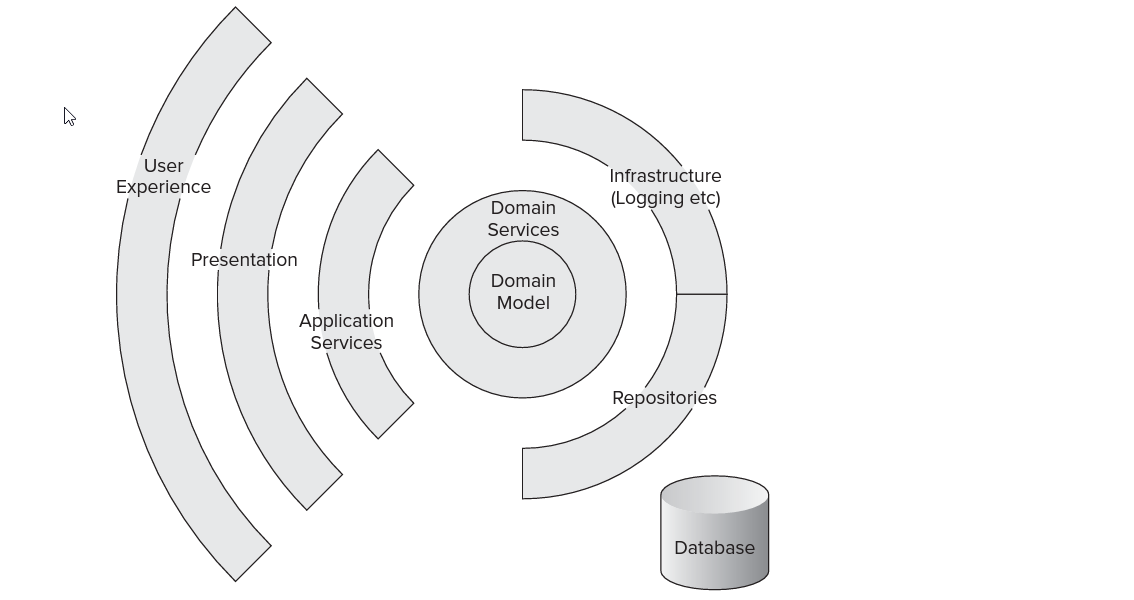
To demonstrate how you can achieve SoC through layering an ASP.NET application and to look at details of each of the layers, you will reconstruct the small e-commerce page that you built earlier to demonstrate the Smart UI antipattern.
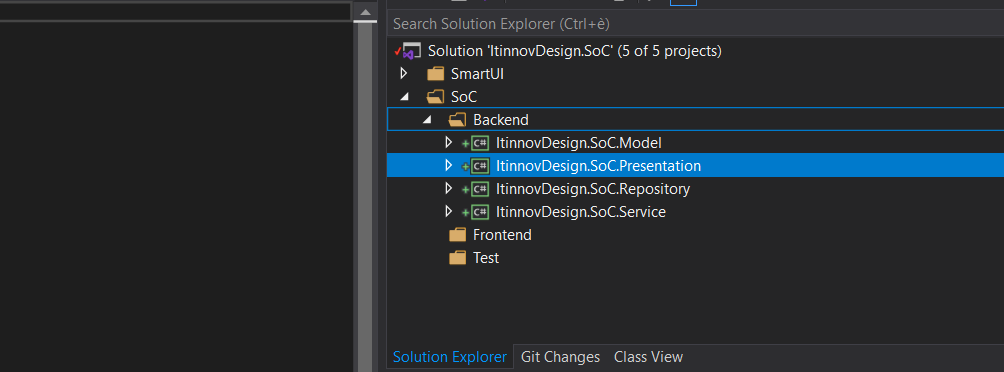
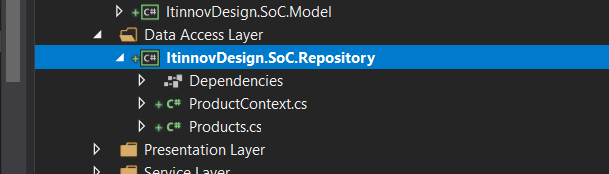
Add 4.net class library, to SoC/Backend solution folder by right-clicking the solution name and selecting Add ➪ New Project. Name the new project and selected .net standard library “ItinnovDesign.SoC.Repository”, “ItinnovDesign.SoC.Model”, “ItinnovDesign.SoC.Service”,”ItinnovDesign.SoC.Presentation”
Your solution should look like this:
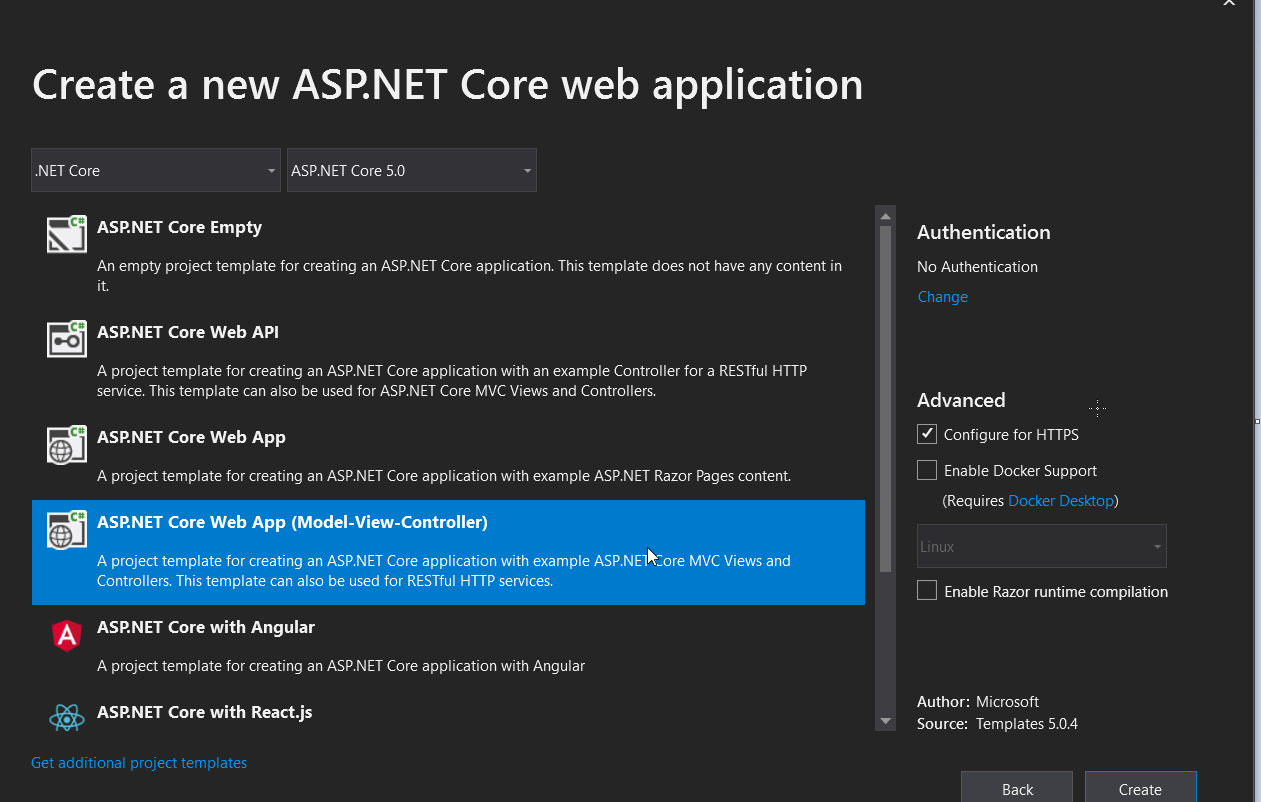
Add a new web form project tp the frontend solution folder “ItinnovDesign.SoC.WebUI”. Also add an asp.net core MVC project “ItinnovDesign.SoC.WebUI.MVC” to the same solution folder, also add an empty web project to only hold the angular project “ItinnovDesign.SoC.WebUI.Angular”. The idea here is to show that by refactoring our code with layer and by applying SoC, we have the flexibility to have muliple client consume share our buisness logic and we don’t have to always repeat ourselve. In the test solution folder add to xUnit test project, we are going to see how applying SoC in a project can help us add unit test more easely to the project, so add ItinnovDesign.SoC.Repository.Test and ItinnovDesign.SoC.Service.test

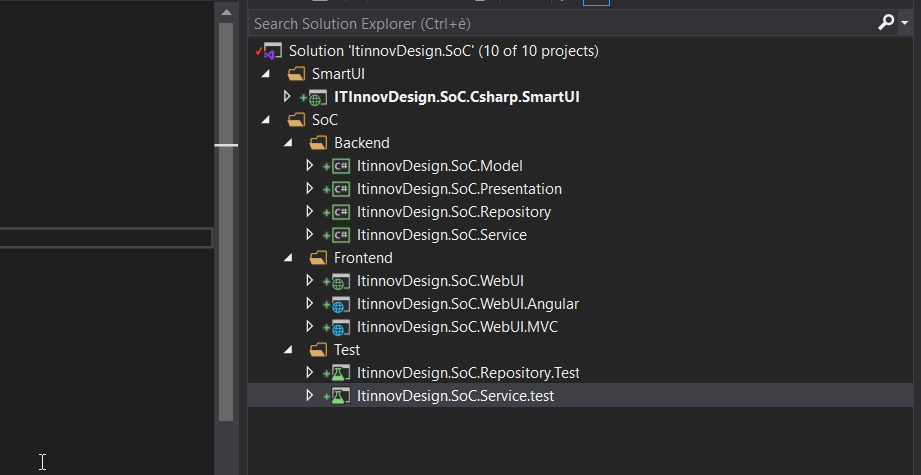
so now our solution will be looking like this:
Right-click on the ItinnovDesign.SoC.Repository project and add a project reference to the ItinnovDesign.SoC.Model project. Also do the same things for ItinnovDesign.SoC.Repository.Test project, from test projec add a reference to ItinnovDesign.SoC.Repository.
Right-click on the ItinnovDesign.SoC.Service project and add a project reference to the ItinnovDesign.SoC.Repository and ItinnovDesign.SoC.Model projects. Also do the same things for ItinnovDesign.SoC.Service.Test project, from test project add a reference to ItinnovDesign.SoC.Service
Right-click on the ItinnovDesign.SoC.Presentation project and add a project reference to the ItinnovDesign.SoC.Model and ItinnovDesign.SoC .Service projects.
Right-click on the ItinnovDesign.SoC.WebUI web application and add a project reference to the ItinnovDesign.SoC.Model, ItinnovDesign.SoC.Service, ItinnovDesign.SoC.Presentation, and ItinnovDesign.SoC.Repository projects. Also do the same things for ItinnovDesign.SoC.WebUI.MVC project.
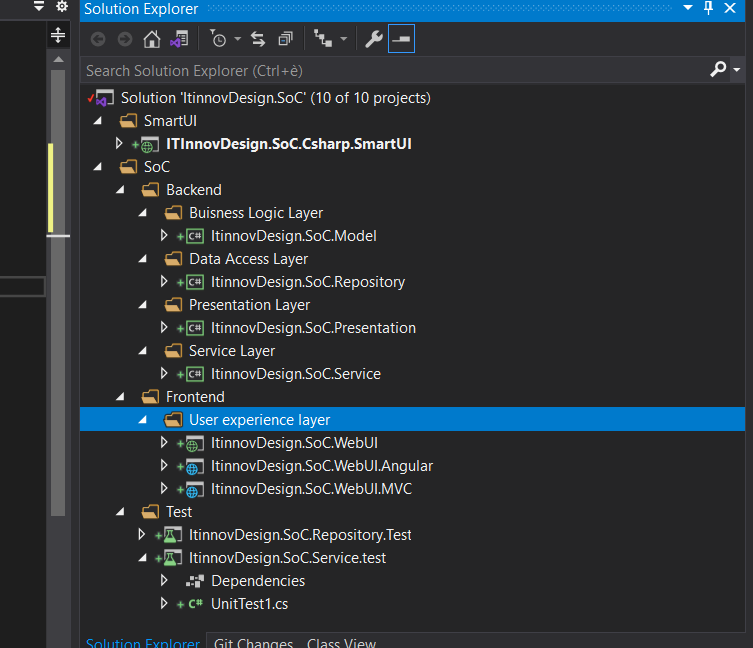
We can also use visual studio solution folder to well organize our project so that it self describe for every body
You’re going to start by implementing the business logic for the application. In the Smart UI example, you will remember that the business logic was intermingled with the presentation logic in the code-behind of the ASPX page. With the layered approach, you’ll create a domain model to hold all behavior and data related to the business of the simple e-commerce store that we are modeling. A domain model is just a conceptual model of the system containing all the entities involved and their relationships.The Domain Model pattern is designed to organize complex business logic and relationships.
The image bellow show the model being use in the SoC solution:

The Product class represents the products of the e-commerce store; the Price class will contain the business logic to determine savings and discount; and the discount strategy implementations will contain the logic to apply the trade discount and no discounts, respectively.
You will create the domain model in the ItinnovDesign.SoC.Model project. Add a new interface to the ItinnovDesign.SoC.Model project named IDiscountStrategy with the following definition:
The purpose of naming the interface IDiscountStrategy is that it actually matches a design pattern named Strategy. This pattern is being applied here because it enables algorithms to be selected and changed at runtime. The algorithms that will be applied to the Price object are the Discount algorithms. If you look back at the Smart UI example, you will notice that the language I used to describe the process of applying discounts to products used the word strategy. When describing a problem, generalize it and focus on the variations. By doing so you will often happen upon the name of a design pattern, and the solution to your problem will present itself without you even looking for it.The Strategy pattern enables an algorithm to be encapsulated within a class and switched at runtime to alter an object’s behavior.
Now that you have the interface, you can add the two implementations of the discount strategy. First, create a new class named TradeDiscountStrategy with the following definition:
Second, employ the Null Object pattern . Create a new class named NullDiscountStrategy with the following definition:
With the discounts strategies in place, create the Price object. Create a new class named Price with the following definition:
The Price object uses the setter flavor of Dependency Injection to enable the discount strategy to be applied to the product’s price.
To complete the model, create the simple Product class. Add a new class to the model project named Product with the following code listing:
https://gist.github.com/Defcoq/ab8b2661d201c7259ab83ed2f325d88b#file-priceThe business entities are created, but you need a way to hydrate the products from a data store. A service will allow clients to interact with the domain model and retrieve products with a discount applied. To enable the client to specify which discount to apply to the products, you need to create an enumeration that will be used as a service method parameter.
Again, to determine which discount strategy to apply to the price, you need to create a factory class whose sole responsibility will be to return the matching discount strategy for a given CustomerType (The Factory pattern enables a class to delegate the responsibility of creating a valid object).
The service layer will interact with a data store to retrieve products. You will use the Repository pattern (The Repository pattern acts as an in-memory collection or repository for business entities, completely abstracting away the underlying data infrastructure)to achieve this, but you will only specify the interface for the repository because you don’t want the model project to be concerned with the specifi cs of what kind of data store will be used or what kind of technologies will be used to query it. Create a new interface named IProductRepository with the single method as shown here:
The service class needs to be able to apply a given discount strategy to a collection of products. You could create a custom collection to achieve this, but I prefer the flexibility of extension methods, so create a new class named ProductListExtensionMethods with the following definition:
The Separated Interface pattern ensures that the client is completely unaware of the concrete implementations and can help to promote programming to abstractions rather than implementations and the Dependency Inversion principle.
You can now create the service class that clients will use to interact with the domain. Create a new class named ProductService with the code listing that follows:
You have now completed all of the business logic that the application will contain. Notice how the business layer is not tied to a particular data store and uses interfaces to program against a repository for all of its persistence needs. The business layer can now be tested in complete isolation from any other part of the application and will also not be affected by changes to other layers. The next layer you will work on is the service layer, which will act as the gateway into the application.
The role of the service layer is to act as an entry point into the application; sometimes this is known as a facade (The Facade pattern provides a simple interface and controls access to a series of complicated interfaces and subsystems). The service layer provides the presentation layer with a strongly typed view model (View models are strongly typed classes that are optimized for specific views and contain logic to assist in the presentation of data), sometimes called the presentation model. A view model is a strongly typed class that is optimized for specifi c views. The view model you will be creating will display the products;
Add a new class to the ItinnovDesign.SoC.Service project named ProductViewModel with the following class listing:
For a client to interact with the service layer, you will be using a Request/Response messaging pattern. The request part will be supplied by the client and will carry all necessary parameters; in this case, it will contain the CustomerType enumeration as defined in the domain model. Create a new class named ProductListRequest matching the code that follows:
For the Response object, you will define a few more properties so that the client can check whether the request was completed successfully. There will also be a Message property to enable the service to give information to the client if the call was not completed successfully. Create a new class named ProductListResponse with the code listing that follows:
To convert the Product entity into the ProductViewModel, you need a couple of methods: one to convert a single product and one to convert a list. You could add these methods to the Product entity in the domain model, but they aren’t exactly business logic, so the next best thing is to create them as extension methods so that they can be used as if they were first-class citizens of the Product entity.
Create a new class within the Services project named ProductMapperExtensionMethods, and add the two methods shown in the following code listing:
Finally, add the ProductService class that will interact with the domain model service to retrieve a list of products and then convert them to a list of ProductViewModels. Add a new class to the service project named ProductService, with the following definition (you’ll need to add “System.Data.SqlClient” nuget package to the project):
The service class catches any errors and returns a friendly message to the client; this is a good place to log errors. By handling any errors here and exposing a success flag, you enable the client to react elegantly if there is a problem with the service layer. This completes the service layer of the application and you can move on to creating the data access layer.
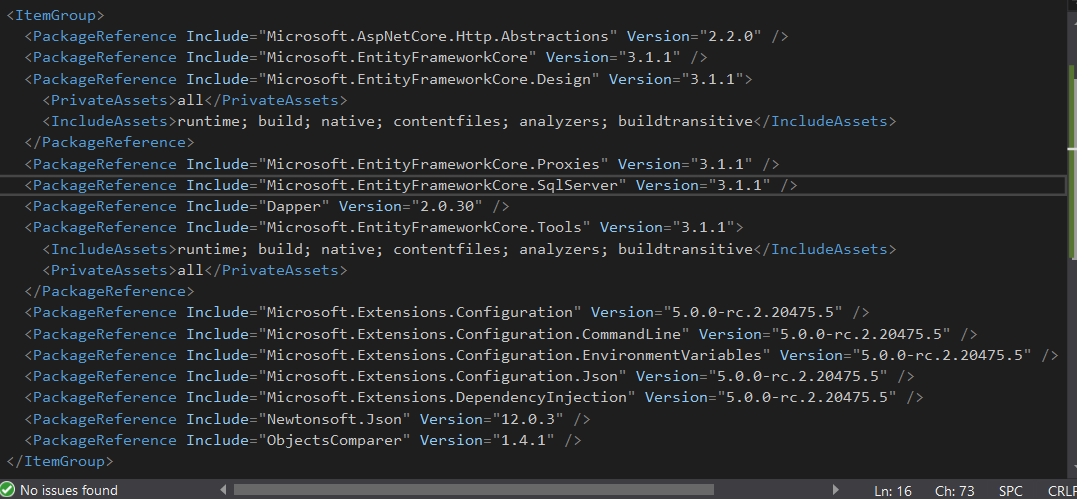
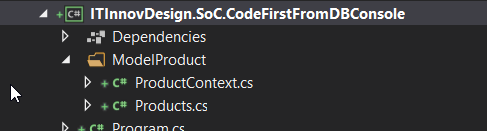
Like I did in DDD post I’ll use EF(EntityFramework) for the data access layer by generating the dbcontext base on the db we created in SmartUI by using code first from database approach. To do that I create a dummy .NetCore Console application call “ITInnovDesign.SoC.CodeFirstFromDBConsole” base on .core 3.1 I then add refence to all EF nuget package so that I can generate dbcontec frpm my existing db
All you need to do is to open a powershell terminal inside this dummy project and launch this command:
dotnet ef dbcontext scaffold “server=(LocalDB)MSSQLLocalDB;AttachDbFilename=C:WorksapceDot.netCoreSampleItinnovDesign.SoCITInnovDesign.SoC.Csharp.SmartUIApp_DataShop.mdf;Integrated Security=True” Microsoft.EntityFrameworkCore.SqlServer -o ModelProduct -t Products -f
You’ll need to provide the complete path of where the “Shop.mdf” db file is. This command will create the context and the code first Product class we need to use to access the database, copy this two file inside the ITInnovDesign.SoC.Repository project
You can now create a concrete implementation of the IProductRepository interface that you created in the model project. Add a new class to the Repository project named ProductRepository with the following definition.
Presentation layer
To separate the presentation logic from the user experience (user interface), employ the ModelView-Presenter pattern, This layer here is using to only show how we can factory a legacy asp.net web form to using MVP pattern so that our webform can be very clean. Create a new interface in the ItinnovDesign.SoC.Presentation project named IProductListView with the following contract:
This interface will be implemented by the ASPX web form. By working with interfaces, you can stub out the view when it comes to testing. Create a new class named ProductListPresenter with the following code listing:
The presenter class is responsible for obtaining data, handling user events, and updating the view via its interface.
This completes the very thin and simple presentation layer. The benefit of having the presentation layer is that it is now easy to test the presentation of the data and interactions between the user and the system without worrying about the difficult-to-unit-test web forms. You can also now add any flavor of user experience on top of your application such as WPF, WINforms, REST API, MVC Razor page, or a web forms application. For now, though, you will stick with web forms and you will tackle this layer next.
Finally, you can implement the view so that the products are displayed on the web page. Before getting to work on the HTML, however, you need a way to glue the loosely coupled application together so that concrete implementation of the IProductRepository is created. I’m using Autofac here for resolving dependency, so add Autofac.Web nuget package to “ItinnovDesign.SoC.WebUI” and change your “Global.asax” file so that it will contain the code bellow (you also have to modify your web.config like described in autofac link):
Open the default.aspx source view and edit the HTML markup so it matches what follows:
and the code behind file like this:
The page simply creates a new instance of the ProductListPresenter during the page initiation event and obtains an implementation of the ProductService from autofac . The page then delegates all the other work to the Presenter, simply handling user events and forwarding calls.
There was a lot more work involved in creating the layered application, but you now have a loosely coupled application that can be tested, is maintainable, and has a strong separation of concerns. The figure bellow show the interaction for each layer

We can now build a REST API endpoint with the same layer and use it in an angular or MVC razor application page, or a windows form ecc.. you can try it yourselve by completing all fronend project (in some other post I’ll completed the rest of frondend project namely angular and MVC). This great example was taking from an old book “asp.net design pattern”. I hope it will help so share.The final solution can be view here in my github account

Subscribe to Aide En Informatique's newsletter to receive the latest news and exclusive offers.
12.08.2022, 17:03
Comments: 0

12.08.2022, 17:04
Comments: 0
17.08.2022, 22:01
Comments: 0
31.08.2022, 17:12
Comments: 0
Bienvenue sur ITInnov-Design, l'espace des informaticiens, l'espace du codage, le lieu par excellence ou on essaye d'expliquer les choses complexes de manière Simple et surtout Terre à Terre pour permettre à tous ceux qui veulent s'avventurer dans le monde de l'informatique et du coding de ne pas etre frustré et d'entrer par la grande porte. Tous nos postes sont vos préoccupations et tout commentaires de votre part peut etre l'objet d'un autre post pour mieux eduquer, mieux approffondire et du coup n'hesitez pas à faire des questions, des remarques des suggestions dans tous nos canaux de communication de manière qu'on puisse aborder beaucoup de sujet meme de manière repetitives car, on peut expliquer la meme chose plusieurs fois de plusieurs manières differentes: en Informatqiuey, Qui Maitrise mieux son Sujet doit pouvoir l'expliquer de manière simple à un débutant Ou à une persone qui est nouveau ou ignorant sur le sujet c'est notre objectif.

LarrySig Guest
24.05.2024, 18:18
Post: Comment fonctionnent Internement les guichets automatiques ?
Orvilledop Guest
22.05.2024, 00:57
Post: Comment fonctionnent Internement les guichets automatiques ?
Orvilledop Guest
15.05.2024, 16:04
Post: Comment fonctionnent Internement les guichets automatiques ?
Franck Guest
14.05.2024, 19:34
Post: Comment deployer un site web statique sur github?